
You’ve got a mirror. It’s fine. It reflects your face and your questionable haircut. But it could look so much better with about a weekend’s worth of effort and a little personality. Ready to turn that “meh” mirror into a total scene-stealer? Let’s upcycle it—fast, fun, and without a visit from your credit card company’s fraud department.
1) Rustic Wood Slat Frame (aka: Instant Warmth)

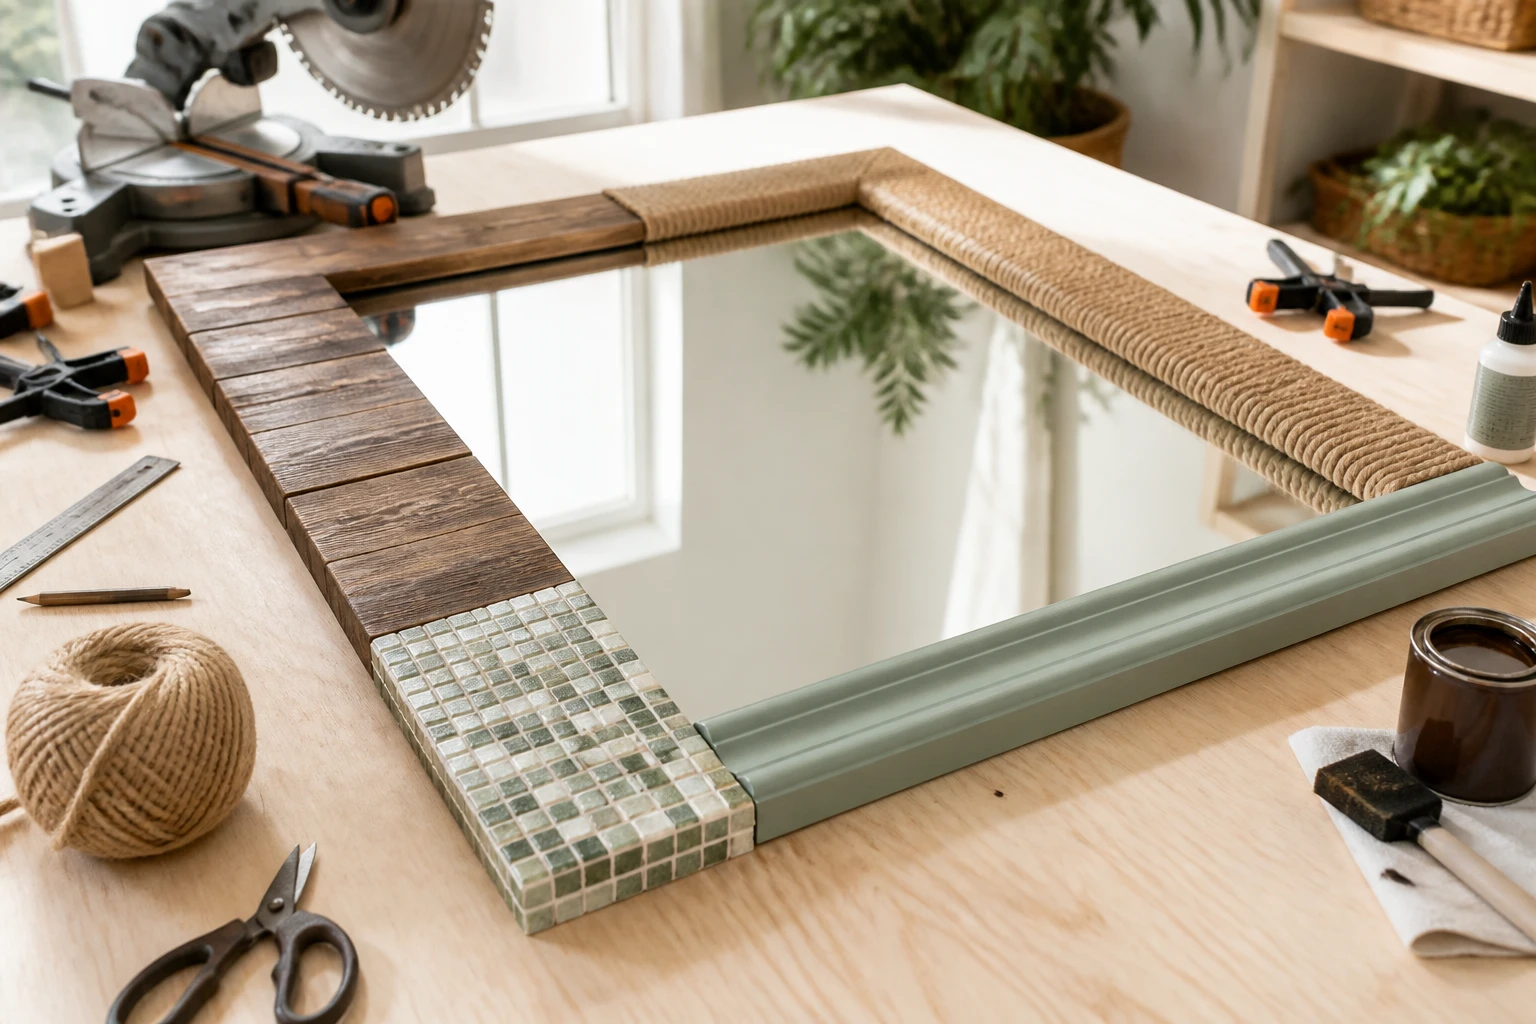
Want cozy cabin vibes without moving to the woods? Wrap your mirror with thin wood slats for a warm, rustic look. It works with farmhouse, modern, or eclectic styles and makes a cheap builder-grade mirror look custom.
What you’ll need:
- 1×2 or 1×3 wood slats (pine or cedar)
- Wood stain or paint + poly
- Construction adhesive and miter box/saw
- Clamps or painter’s tape
How to do it:
- Measure your mirror and cut four pieces with 45° mitered corners.
- Sand, stain or paint, then seal with polyurethane.
- Run a bead of adhesive on the back edge of each slat and press onto the mirror edge.
- Clamp or tape in place until dry. Done and dusted.
Pro tip
Mix wood tones. Stain the top and bottom slats darker and the sides lighter. It adds subtle dimension without extra work. FYI, it looks expensive.
2) Rope-Wrapped Coastal Frame

If you crave beach-house energy (without fighting sand forever), wrap your mirror with thick sisal or jute rope. It’s ridiculously forgiving and hides wonky edges like a champ.
Supplies:
- 3/8″–3/4″ sisal or jute rope
- Hot glue gun + glue sticks
- Painter’s tape and scissors
Steps:
- Tape one end of the rope to the back of the mirror as an anchor.
- Work in small sections, hot-gluing the rope around the perimeter.
- Keep each wrap tight and aligned. Trim and tuck the end behind the mirror.
Style tweak
Add a thin white cotton rope between rows for a nautical stripe. IMO it looks designer without the designer price tag.
3) Fluted Trim, Zero Power Tools

The fluted look feels modern and chic. You can fake it with wood dowels or half-round trim. No table saw needed, no drama required.
Grab this:
- 1/2″ half-round trim or 1/2″ dowels cut in half
- Miter shears or small hand saw
- Construction adhesive
- Primer + paint (satin or semi-gloss)
Make it happen:
- Cut pieces to length for all four sides.
- Prime the trim first for an easier paint job later.
- Glue the trim vertically, side by side, all around the mirror.
- Paint it a bold color or go tone-on-tone to match your wall.
Color ideas
Try deep teal, charcoal, or toasted caramel. Dark frames make the mirror pop and hide fingerprints, which is honestly a gift.
4) Gallery-Style Mat With Paint

You know those chic framed mirrors with big white mats? You can mimic that vibe with paint and painter’s tape, no actual mat needed.
Materials:
- High-adhesion painter’s tape (sharp lines matter)
- Primer for glass + paint (white or a contrasting accent)
- Measuring tape and a level
Directions:
- Tape off a “mat” border on top of the mirror glass—usually 2–4 inches wide.
- Prime the exposed glass, let it dry, then paint two coats.
- Peel tape carefully for crisp edges. Add a thin wood strip frame if you want extra polish.
Why it works
The painted mat gives the mirror breathing room so it reads like art. Also, it hides those annoying blackened mirror edges. Win-win.
5) Cane or Rattan Trim for That Breezy Look

Cane webbing adds texture, airiness, and a touch of vintage. Pair it with a slim wood border and boom—you’ve got a boutique mirror.
You’ll need:
- Pre-woven cane webbing (soak it to soften)
- Sharp scissors or craft knife
- Wood trim (thin lattice or screen trim)
- Staple gun or strong adhesive
How-to:
- Soak cane in warm water for 20–30 minutes so it flexes.
- Cut strips to fit around the mirror edges, overlapped on the frame or backing.
- Adhere or staple cane in place, then cover the edges with thin trim for a neat finish.
- Let it dry taut. Optionally, add a light stain to warm it up.
Design note
Mix cane with black trim for contrast. It gives off “I shop small-batch interiors” energy without the price tag.
6) Tile It: Mini Mosaics or Zellige Vibes

You can tile a mirror frame and feel wildly clever about it afterward. Use peel-and-stick mosaics for speed or real tile for a luxe finish.
Tools and supplies:
- Peel-and-stick mosaic sheets or real tile + tile adhesive
- Tile nippers (for real tile)
- Grout + float + sponge (skip for peel-and-stick)
- Tile edge trim (optional)
Steps:
- Mark the frame borders and dry-fit tile sheets.
- Adhere tiles carefully, keeping lines straight.
- If using real tile, grout after adhesive cures and wipe clean.
- Finish with edge trim if needed for a clean profile.
Keep it light
If your mirror hangs on drywall, choose lightweight tiles or stick to peel-and-stick. Your studs can only handle so much “aesthetic.”
7) Leather Strap & Bracket Glow-Up

No frame? No problem. Add a faux “suspension” look with leather straps and a decorative knob. It gives immediate boutique-hotel vibes.
What to gather:
- Wide leather belt or leather strips
- Decorative knob/hook rated for the mirror’s weight
- Strong epoxy or rivets for leather ends
- Wall anchor and hardware
Assembly:
- Create a loop or two side straps that wrap the mirror.
- Secure leather ends with epoxy or rivets.
- Mount the knob into a wall anchor, then hang the straps.
- Use hidden mirror clips if you need extra support, FYI.
Style twist
Try cognac leather on white walls or black leather on light oak. It’s subtle, but it hits.
8) Painted Frame With Gilded Inner Edge

Sometimes you just need paint and a little glam. Add a thin gilded line along the inner edge and watch the mirror glow like it got eight hours of sleep.
Supplies:
- Primer + high-quality paint
- Gold leaf kit or metallic gold paint pen
- Fine-angle brush and painter’s tape
Steps:
- Clean, sand lightly, and prime your existing frame.
- Paint two coats in your color—think greige, inky blue, or even terracotta.
- Tape off a 1/8″ inner border and apply gold leaf or metallic paint.
IMO, go bold
A deep color with a gold edge makes the mirror look custom and high-end. Pair with brass hardware and call it a day.
Planning, Prep, and Zero-Regret Tips

Measure twice, cut once. It’s a cliché because it saves projects and sanity. Dry-fit everything before gluing.
Mind the weight. Heavy frames demand sturdy anchors or studs. Check the mirror’s backing and hardware rating.
Protect the glass. Tape paper over the mirror while you work. Scratches happen fast when you’re in the zone.
Adhesive matters. Use construction adhesive for wood-to-glass and E6000 or epoxy for tricky surfaces. Hot glue works great for rope and fabric.
Finish smart. Seal painted or stained wood with water-based poly to prevent smudges and make cleaning easier.
Quick Style Combos That Just Work

- Matte black fluted trim + crisp white walls = modern classic
- Warm cedar slats + cane corner insets = organic modern
- Navy painted frame + gilded edge = preppy luxe
- Jute rope + white cotton stripe + driftwood accents = coastal calm
- Peel-and-stick marble mosaic + thin brass L-brackets (purely decorative) = high-gloss glam
FAQ
Can I frame a mirror without removing it from the wall?
Yes, if it’s securely mounted and you can access all sides. Tape off the wall and glass, then glue on lightweight trim or rope. For heavy wood or tile, take it down so you can clamp and align properly.
What’s the best adhesive for wood on glass?
Use a construction adhesive rated for multi-surface bonding. Apply in thin, even beads and give it full cure time. If the mirror has a protective film on the back, avoid solvent-based glues that can damage it.
How do I cut perfect mitered corners?
Use a miter box and fine-tooth hand saw, and mark your angles clearly. Cut a hair long, test fit, then shave off tiny slices until the joint closes. A little wood filler and sanding hides micro-gaps like magic.
Will rope or cane attract dust or moisture?
Both collect dust, but a soft brush attachment on your vacuum handles it. For bathrooms, seal cane lightly and use a vent fan; rope holds up fine if you avoid direct soak zones. Quick wipe-downs keep everything fresh.
How do I keep tiles aligned on a frame?
Dry-fit first, then snap a light pencil line as a guide. Start from the most visible edge and work out. Use spacers for real tile, and don’t rush the grout—clean as you go to dodge haze.
What paint finish looks best on mirror frames?
Satin or semi-gloss balances durability and sophistication. Matte can scuff, high-gloss shows every brush mark. If you want that lacquer look, sand between coats and finish with a water-based poly.
Conclusion
You don’t need a workshop or a trust fund to upgrade a mirror. Pick one of these eight ideas, grab a free afternoon, and commit. A little trim, paint, or texture turns a boring pane into a statement piece, and you’ll feel wildly capable when you’re done. Now go make your mirror the main character.